


CRISS CP/M User guide
This page contains basic instructions how to use modern DIY computer CRISS CP/M.
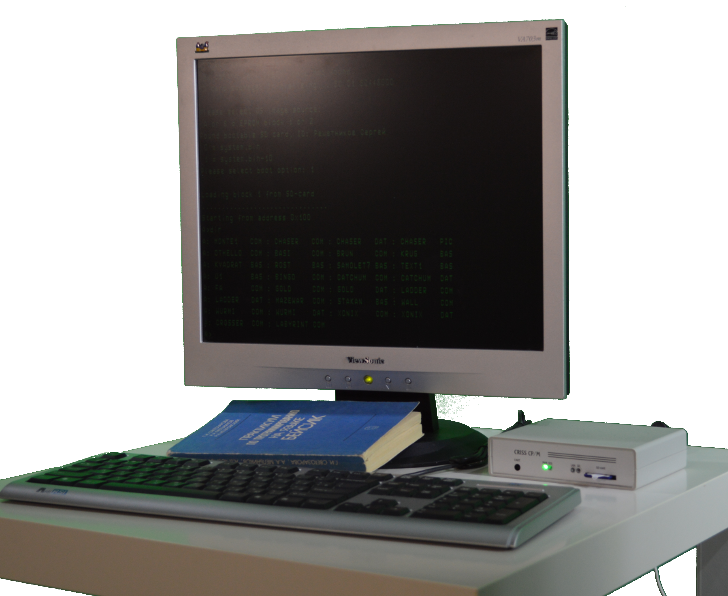
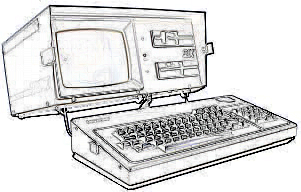
Meet the CRISS CP/M!
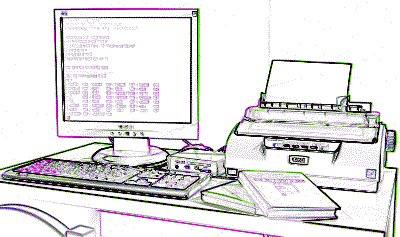
CRISS CP/M is modern 8-bit full-featured computer that you can assemble yourself! Like any other computers CRISS CP/M requires basic peripheral:
- Keyboard, CRISS CP/M works with any standard PS/2 keyboard;
- Monitor, CRISS CP/M supports any VGA monitor;
- SD-card, CRISS CP/M supports any full-size SD-cards;
- serial or parallel printer (option);
- Ethernet connection cable (option).
CRISS CP/M is absolutely unusual modern computer that shows how many resources we're wasting in classic computers: it has only 64 Kb RAM (yes, 64 Kilobytes!) but it is able to do many of standard tasks: type and print texts, work with spreadsheets, play games and many others. The best in 8-bit world OS CP/M is embedded into the CRISS and allows to explore the wonderful life of CP/M software world.
And moreover: CRISS CP/M can be equipped with GPIO digital inputs/outputs and you can use it as the control system: control light, led displays, use buttons etc.
CRISS CP/M comes with:
- OS: CP/M 2.2 = programming languages, text processors, games, business software, ...
- Instructions: Z80 (Zilog), extended with MUL, DIV, and floating-point, 1us LD r,r ops
- Memory: 64Kb SRAM, 128 Kb EPROM
- Video: VGA (!), monochrome, up to 25x80 chars, 5 symbols sets, graphic 160x96 px
- Storage: SD-card
- Keyboard: standard PS/2
- Printer: YES, serial or LPT
- Interfaces: RS-232, UART, Ethernet, GPIO
- Real time clock with battery (option)
- Single-tone melody generator with built-in speaker
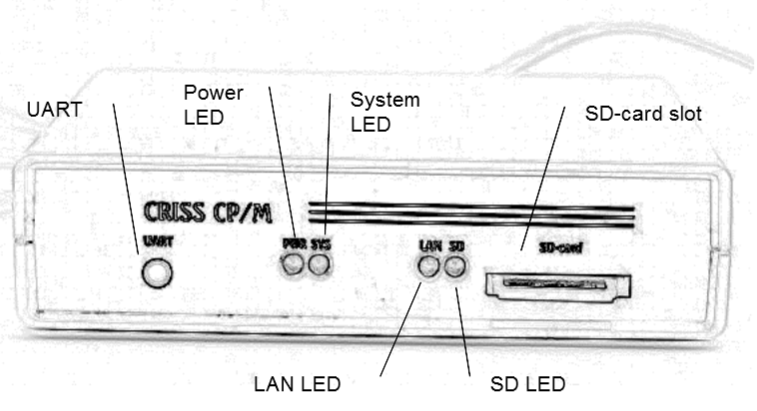
CRISS CP/M is a single-box device with all main controls and indicators collected on the front panel.
Setting up your CRISS CP/M
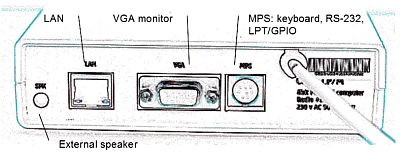
After you have purchased or build your CRISS CP/M computer, please connect it to the PS/2 keyboard and VGA monitor, using sockets on the back panel, insert the pre-programmed SD-card, plug it to the power line 120 or 230 VAC and switch it on using the switch on the cable.
Please take into account some details:
- CRISS CP/M has two optional socket for the keyboard, this socket is marked as MPS: 6pin and 8pin. If your CRISS CP/M has 6pin socket you can connect keyboard directly to the socket. In the case if your computer has 8pin socket (you're lucky - it is maximal version) you'll need special adapter that allows to connect to the MPS: keyboard, RS-232 devices (serial printer for example) and you will have LPT port that can be used for printer and 24-channel GPIO.
- SD card must be pre-programmed, you can either download image from the support website or build it yourself following this manual. But in any case it will not take more than 10 minutes. Any type of full-size SD cards can be used.
Turning on and off
To turn computer on use the switch on the power cable, there is no special on/off button on the case.
After the start the computer will show you the welcome screen and after 1 s delay it will show the startup screen with the version info, check the RAM and hardware installed and suggest you to select boot source. Usually SD-card contains only one available boot block and in this case computer will boot-up automatically.
In the case of success you'll see A> prompt, you computer is ready to use!
If your CRISS CP/M has EEPROM chip installed you'll be able to load saved previously state: RAM and terminal settings. So, if before switching off you'll do it during the booting procedure you'll be able to resume your work.
To switch computer off please ensure that you have saved you job and switch off the switch on the power cord. That's all, you needn't do any special procedures.
System cosole
System console is the main tool that should be used to setup your CRISS CP/M computer. To invoke system console please press Ctrl-Alt-Del keys combination after the computer is loaded. To navigate in the console please be sure that local keyboard layout is not activated.
All console commands have format X = Function where X is the key, associated with the functions. You need press the associated key to activate function you need.
System console functions overview:
- A-D = change floppy image in the drive A-D;
- S = re-init SD-card if you need to change it during work;
- I = set IOBYTES controlling I/O mapping to peripheral devices;
- U = debugging options;
- H = select hardware platform has to be emulated;
- R = date/time, LAN and IRQ setup;
- E = working with EEPROM chip: store and restore user sessions;
- Z = terminate current program and return to CCP.
Options available in the system console depend on the chips installed on the PCB. So if you don't have EEPROM chip installed option E will not be available.
To exit from the system console or go to the up-level screen please use ESC key.
Standard use of your CRISS CP/M
This section describes basic procedures how to use CRISS CP/M as a standard computer for a standard users.
Basic functions
Basic OS is CP/M 2.2, so please refer to the CP/M manuals for the advanced use, but for simple use please consider few basic commands:
- DIR - shows content of the floppy image
- ERA filename - deletes file
- REN newfilename=oldfilename - renames file
- TYPE filename - outputs file to the screen.
Executable files have extension .COM, to start it just type filename and press Enter. Be careful: CP/M filenames allows only 8 characters in the name and 3 characters in the extension and upper-case latin symbols only, spaces in the names are not allowed.

CP/M file structure doesn't have folders but there are so-called "user areas" that can be switched with the USER command. This feature is supported but for the practical use looks useless. Please refer to CP/M manuals for more details.
Standard use assumes that you're launching the program and use it in accordance with the user manual for it, but there are some options that you need to know.
When you're downloading programs from the CRISS CP/M support website they are coming with the readme.txt files written in CP866 codepage. Please read them carefully before executing the program and be sure that you've switched to the right terminal mode.
Additional features usually are accessible via the control panel that can be accessed pressing the Ctrl-Alt-Del keys combination.
Changing floppy disks
In the CP/M age there were no HDD storages and USB sticks and people used another way for data storing: floppy disks that contained usually from 360 the 1200 Kb of data, to work with floppies computers have special drives.
Been the CP/M computer CRISS CP/M uses virtual "floppy disks" that can be assigned to two virtual "floppy drives" A and B, to switch between drives use the CP/M commands A: and B:. Basic settings of CRISS CP/M computer assumes using 819 Kb floppy images. To manipulate with them please use CPMTOOLS package.
CRISS CP/M has just one slot for the SD card but SD-card contains up to 32 floppy images. To "change floppy in the drive" you need to invoke the system control panel by pressing Ctrl-Alt-Del, select drive A or B and select the floppy image you want to be "inserted" to the drive.
Changing the terminal setting
Although CP/M OS was the same on the level of basic principles (read/write operation, display/printer output, etc.) but to our huge regret there were no standard functions for any monitor controls: positioning cursor, clearing screen etc. And each computer manufacturer created there own set of such commands. Computers that time were called "terminals". So, for example, depending on the terminal type cursor positioning could be the sequence chr(27) chr(128+y) char(128+x) or chr(27) O chr(32+x) chr(32+y) and many other variations.
Moreover, sometimes some functions were not be accessible via the standard BDOS/BIOS calls and programmers used direct i/o using the system ports. For this reason not all CP/M programs are really 100% compatible, only that we call "console". But most of programs are customized for particular terminal. Fortunately, CRISS CP/M can pretend to be the particular terminal and allows to switch it on the fly.
To do that please invoke the control panel pressing Ctrl-Alt-Del, type H and select the platform the program is written for. Each terminal has its own set of ESC-sequences, emulated ports, character set, codepage, etc. The list of supported terminals is permanently enhancing and if you need support for the specific one please contact support team.
For now CRISS CP/M emulates the following terminals:
- CRISS CP/M as its own terminal
- Robotron PC1715 European version
- Robotron PC1715 Russian version
- Kaypro II / ADM terminals ASCII chars only limited
- Kaypro II / ADM terminals full codepage
- TRS-80
Emulations is not 100% guaranteed, please report all issues to the support team. The list of compatible terminals will be expanded, work is in the progress.
Switching user sessions
If your CRISS CP/M is powered with the EPROM chip, it will get you the ability to use up to 3 user sessions without rebooting.
Start the control panel pressing the Ctrl-Alt-Del and push E. After that you can store your current session from RAM ro EPROM or read stored session to RAM and continue working from the place where you saved it.
It works similar to the Alt-Tab in Windows but data is not lost after power breaks. But be careful to have the same SD card in the holder!
Control actions and rebooting
If something went wrong don't worry: press Ctrl-Alt-Shift-ESC, it will reboot the computer.
CRISS CP/M supports custom regional keyboards, basic version came with the Russian CP866 locale but it can be changed. To switch between latin and regional keyboard please use ScrollLock key: when the led is on the regional charset is engaged. But this feature may not work in some terminals. If you want to add your own regional setting please contact support team.
By default CRISS CP/M uses CP866 codepage that contains pseudo-graphical characters. To make using them easier there are the special option: keypad keys when they are pressed together with the Ctrl-Alt or Ctrl-Alt-Shift returns single or double frames characters. Very cool and comfortable!
Using printers

CRISS CP/M supports standard serial printers like OKI Microline series, EPSON LX/FX series and other. You can choose between two options for printer connection:
- Serial RS-232 connection
- Parallel LPT connection
If you want to use printer you need to have maximal version of the computer, equipped with full-featured 8pin MPS socket and use additional external adapter cable.
Default RS-232 interface settings are:
- Only Tx and Rx pins are supported;
- 9600 bod / 8bit / no parity mode is set
RS-232 port settings can be changed from the user program.
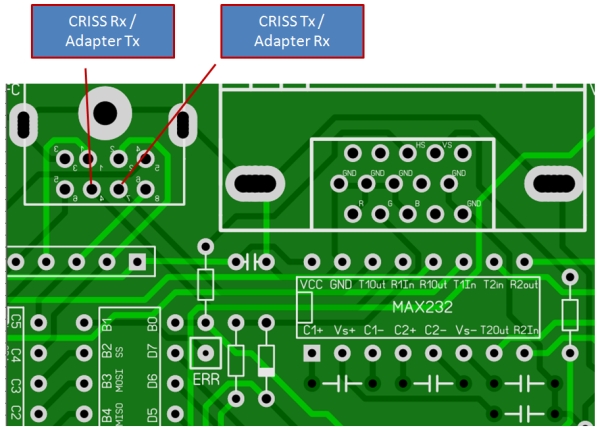
If you have built your CRISS CP/M using MD6 connector it is not a problem to add RS-232 support: just add MAX232 chip and solder wires as is shown on the figure. Any suitable connector may be used, our advise is to use audio socked for it, don't forget to cut PCB leads from the amplifier!
Upgrading and customizing your CRISS CP/M
CRISS CP/M is very flexible device, there are a lot of options that you can fit:
- monitor character sets
- keyboard layout
- configure "user exit" ports action
- etc.
CRISS CP/M has 3 MCU chips inside and all these chips have special firmware. Time to time CRISS CP/M support team announces new versions of the firmware and we highly recommend to install them. Please refer to Firmware upgrade section.
For the customization and localization please refer to the CRISS CP/M customization guide or please contack us via mail@criss.fun, please write CRISS in the subject.
Programming with CRISS CP/M
There are a lot of programming languages that can used with CRISS/CPM: BASIC, C, Turbo Pascal, Turbo Modula, Fortran etc. All special features like LAN or GPIO support are incorporated into the BIOS and can be used with just few lines of code from any language. Even graphical primitives can be used via ESC-sequiences!
Central processor unit uses Z80 commands set, but it is extended with additional commands: MUL, DIV and 4-byte floating point operations.
Please refer to Programmers reference for more details.